# The complete guide to creating and publishing documentation in GitBook \[updated for 2026]

*This guide was updated on 23 January, 2026.*

In this guide, we’ll walk you through the process of publishing documentation in GitBook. You can do this by creating a [docs site](https://app.gitbook.com/s/NkEGS7hzeqa35sMXQZ4X/publishing-documentation/publish-a-docs-site) in your GitBook organization, then linking content from your [spaces](https://app.gitbook.com/s/NkEGS7hzeqa35sMXQZ4X/creating-content/content-structure/space).

It’s a super-simple process that lets you control all the aspects of your published documentation in one place — including customization options, audience settings, and more. And best of all, all you need to get started is a space in GitBook with some content!

### How to create a docs site <a href="#how-to-create-a-docs-site" id="how-to-create-a-docs-site"></a>

Ready to publish your docs? Let’s start by creating a docs site and trying some customization options. There are a couple of different ways to do this, but they all ultimately have the same outcome.

First, you can hit the plus **+** icon next to the **Docs sites** section header in the sidebar to start the site creation flow. First, give your site a name — we recommend something descriptive to make it easy to identify later — then choose how you want to add content to your site.

<figure><img src="https://1940848424-files.gitbook.io/~/files/v0/b/gitbook-x-prod.appspot.com/o/spaces%2FLBGJKQic7BQYBXmVSjy0%2Fuploads%2FAMTcAJSkGkUHSLsGTXZR%2Fcreate-a-site%402x.png?alt=media&#x26;token=6f957957-33fb-4933-a776-6b302caa2134" alt=""><figcaption><p>
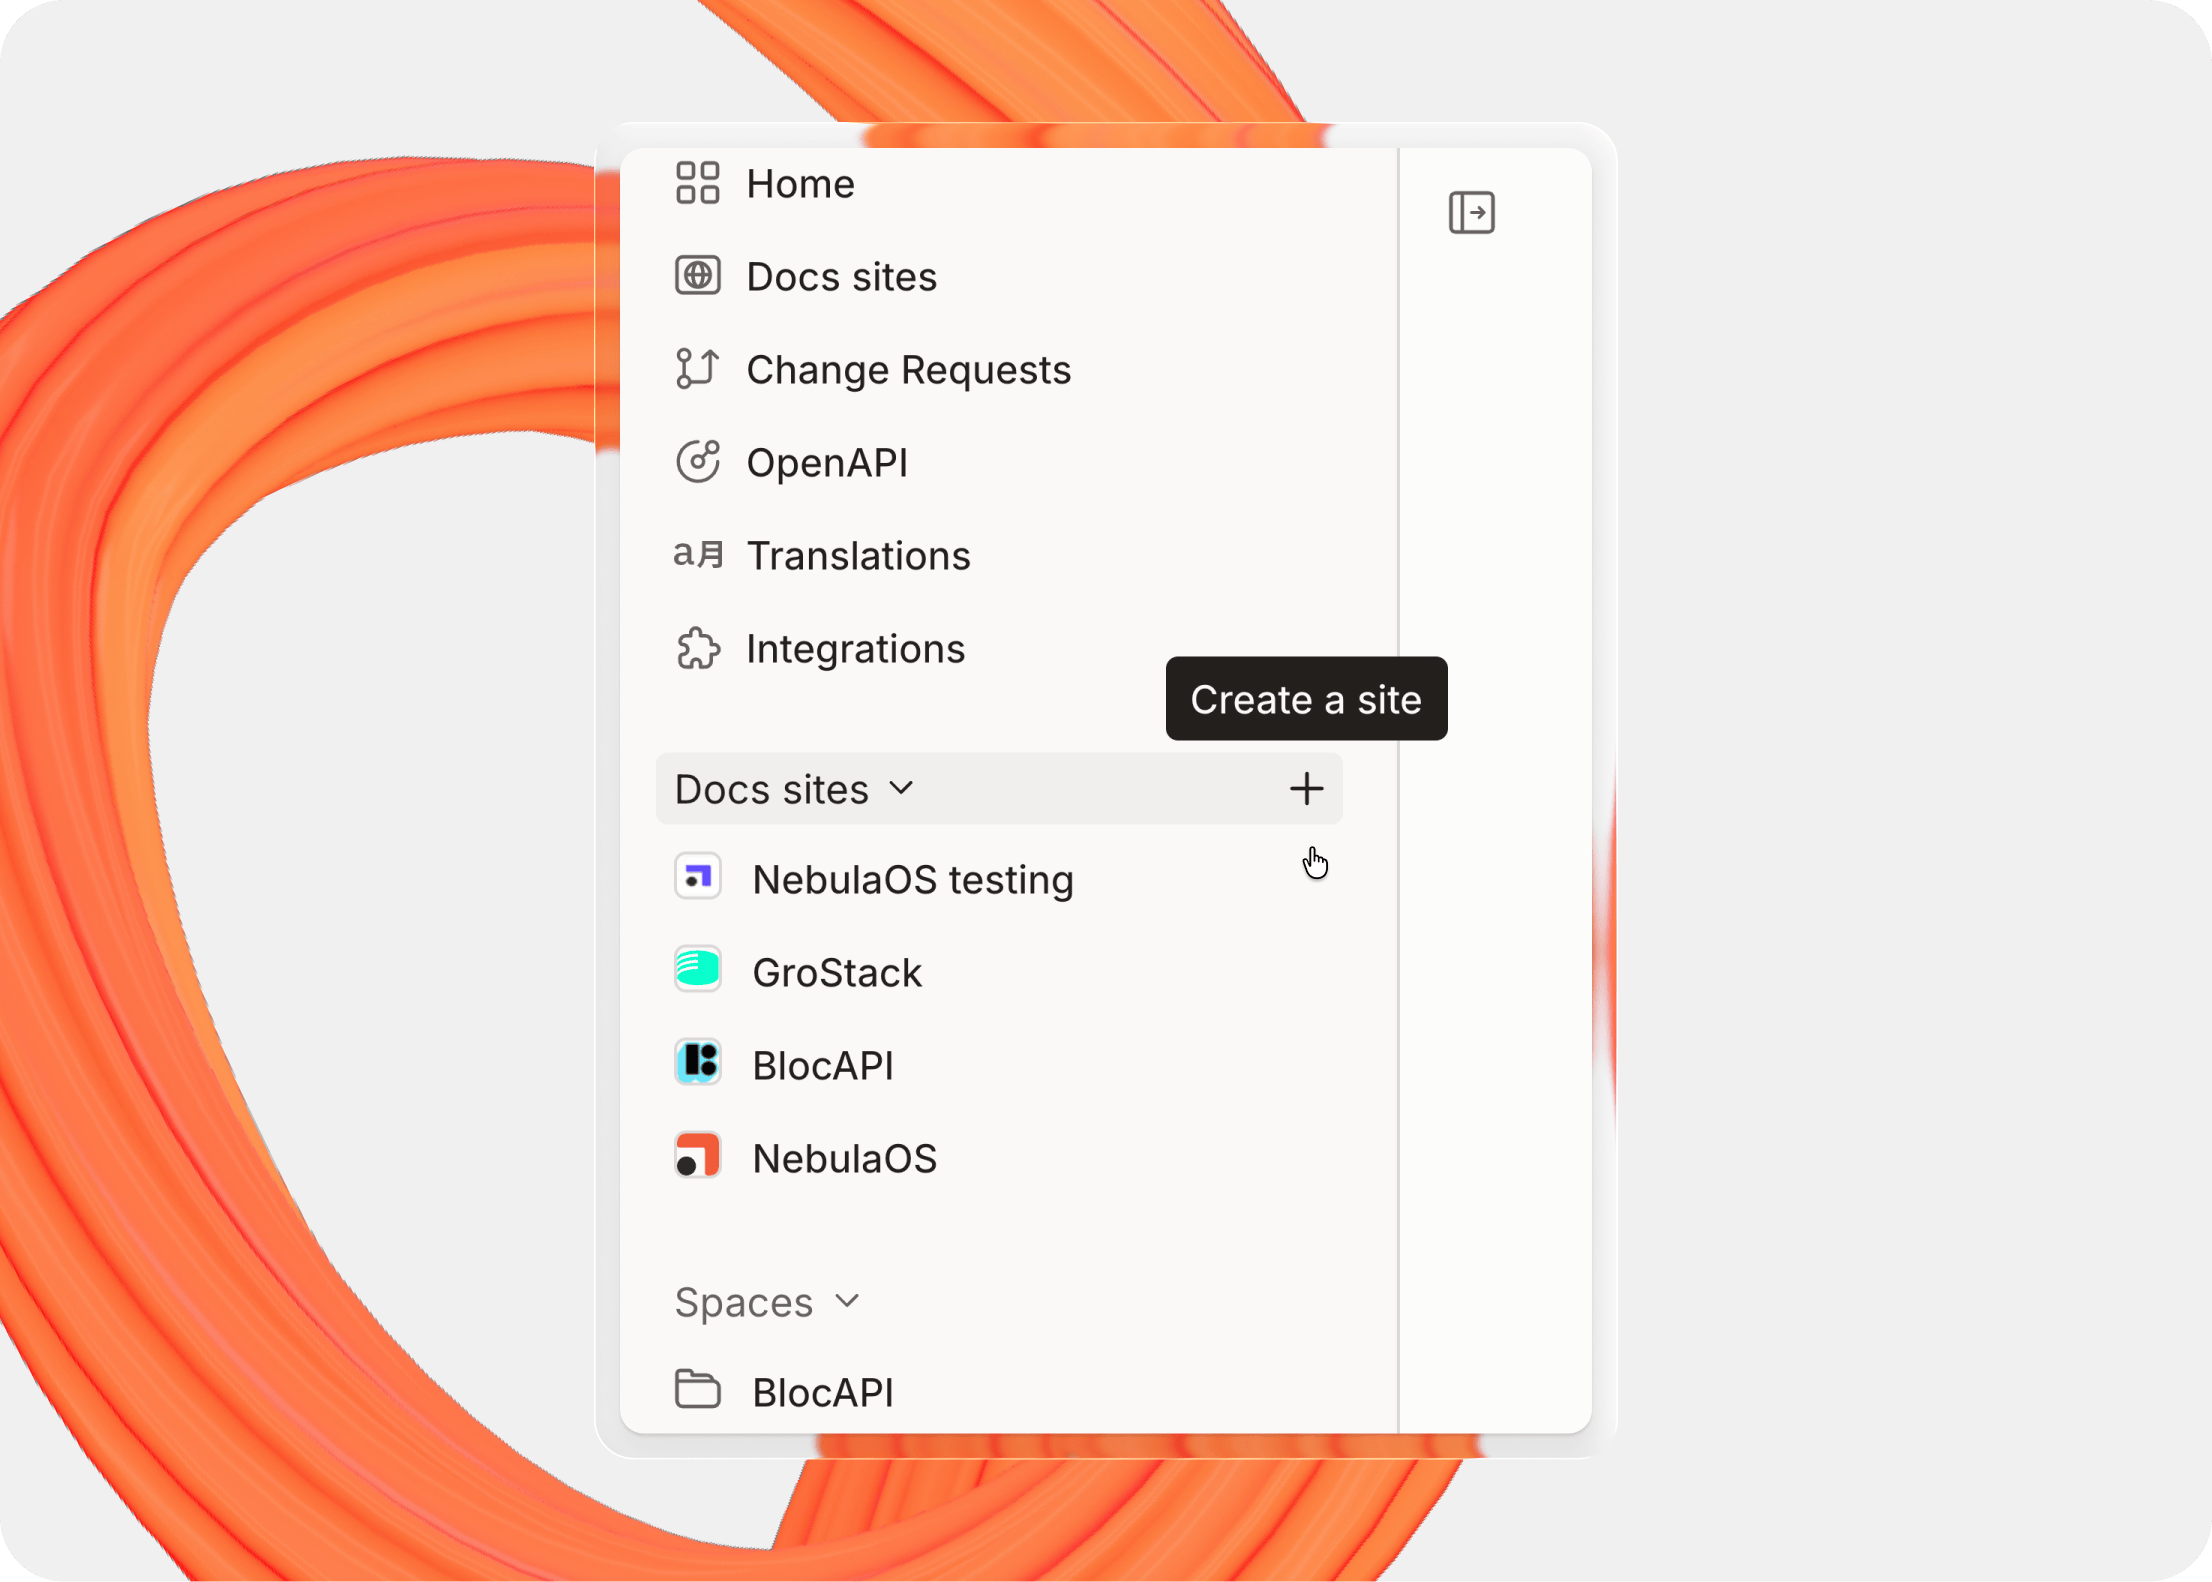
Create a new docs site from the sidebar.</p></figcaption></figure>

You can choose to:

* Start with a documentation template, which includes preset customization options
* Import docs content from outside GitBook
* Start with a new, empty space to create from scratch
* Create API docs by importing an OpenAPI spec file
* Sync to a GitHub or GitLab repository to import your docs
* Select an existing space in your GitBook organization.

If you have a specific space you want to publish, you can use the search at the bottom of this screen to find it and add it to your site.

{% hint style="info" %}
If you want to change the name of your site, you can do that in your site’s settings — just choose the **Settings** tab from your main site dashboard.&#x20;
{% endhint %}

#### Adding more content to your site <a href="#adding-more-content-to-your-site" id="adding-more-content-to-your-site"></a>

You can add more than one space to a single docs site if you like. There are two ways to do this — with site sections and site variants.

[Site sections](https://app.gitbook.com/s/NkEGS7hzeqa35sMXQZ4X/publishing-documentation/site-structure/site-sections) are designed for adding different kinds of content to your site alongside your primary docs — such as API docs, a changelog, release notes, or anything else you need. The different sections will appear as tabs at the top of your site — perfect for centralizing your documentation on a single site.

<figure><img src="https://1940848424-files.gitbook.io/~/files/v0/b/gitbook-x-prod.appspot.com/o/spaces%2FLBGJKQic7BQYBXmVSjy0%2Fuploads%2FbWvDDnVUZE5zXqUFj5vj%2Fsite-structure%402x.png?alt=media&#x26;token=e80579c1-a5d5-455d-9855-7c3d4f0eaec0" alt=""><figcaption><p>
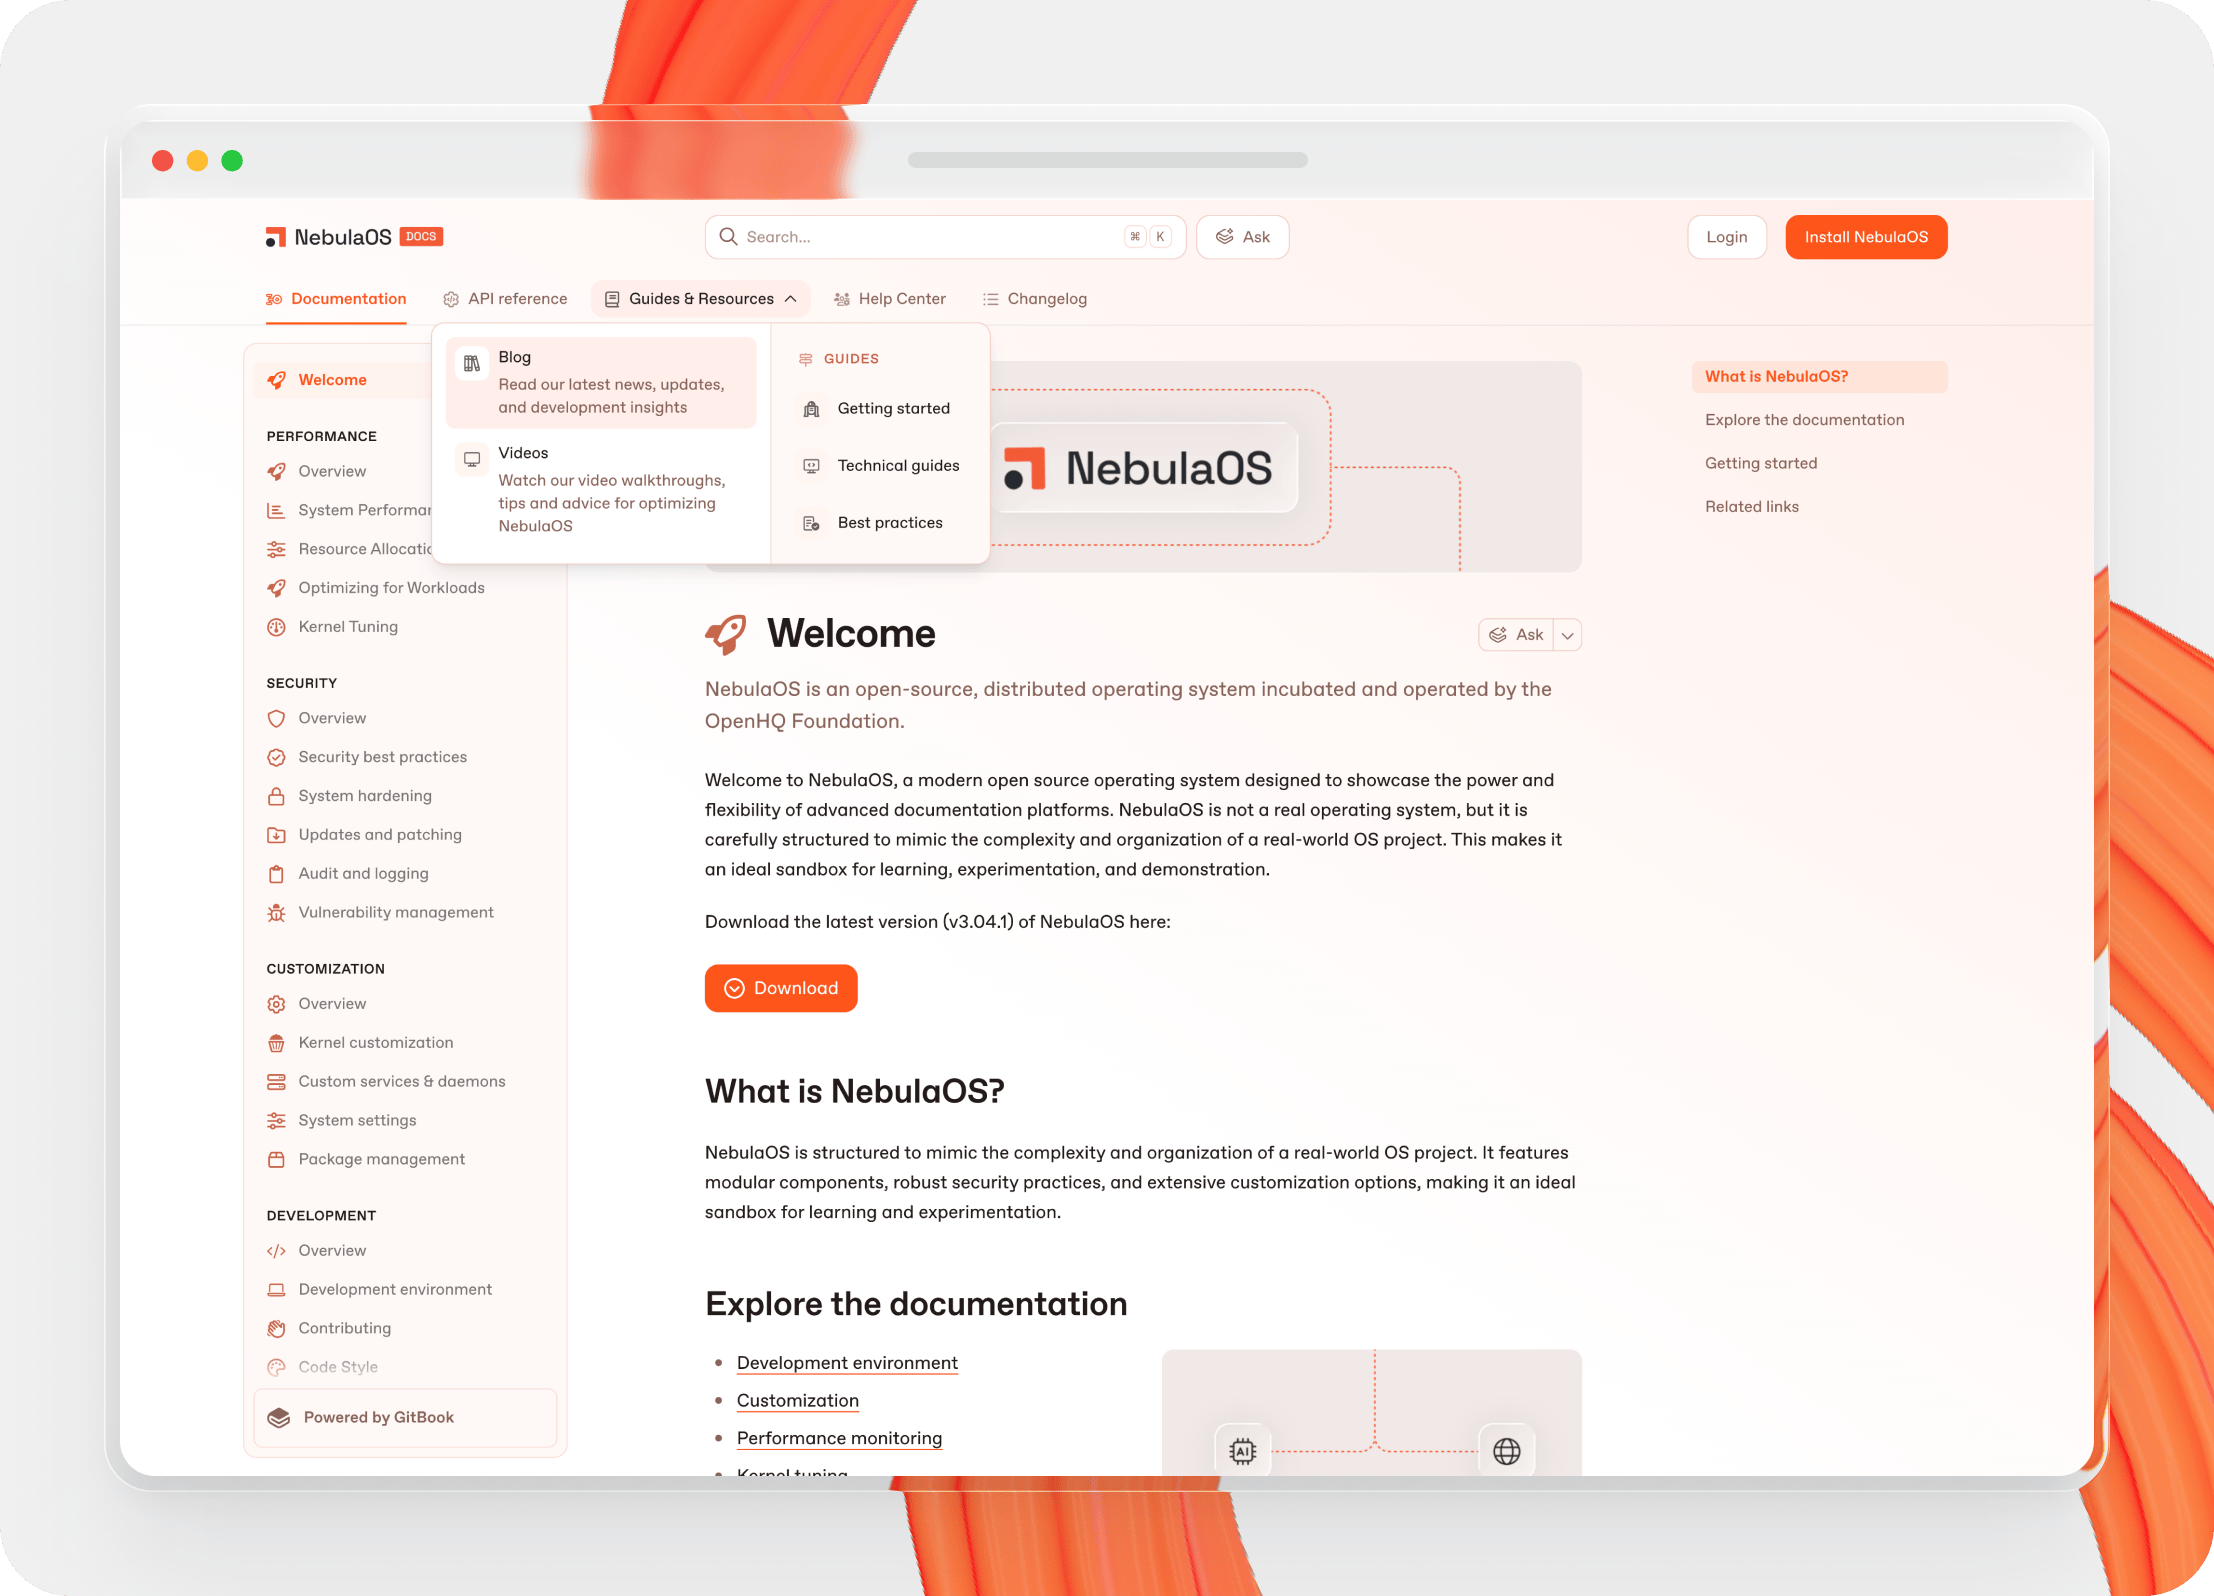
Your site navigation lets end-users jump between different kinds of content easily.</p></figcaption></figure>

[Variants](https://app.gitbook.com/s/NkEGS7hzeqa35sMXQZ4X/publishing-documentation/site-structure/variants) help you show different versions of the same documentation — for example, if you want to [translate your docs](https://app.gitbook.com/s/NkEGS7hzeqa35sMXQZ4X/gitbook-agent/translations) into other languages, or include different docs for release versions of the same product. Visitors will be able to switch between these different variants using a drop-down in the top-right of your published docs site.

<figure><img src="https://1940848424-files.gitbook.io/~/files/v0/b/gitbook-x-prod.appspot.com/o/spaces%2FLBGJKQic7BQYBXmVSjy0%2Fuploads%2Fixi7RtH9YRoI3GT8NAYf%2Flocalization-menu%402x.png?alt=media&#x26;token=bffa4c8d-fe81-40c0-b0c2-756f5fb7615f" alt=""><figcaption><p>
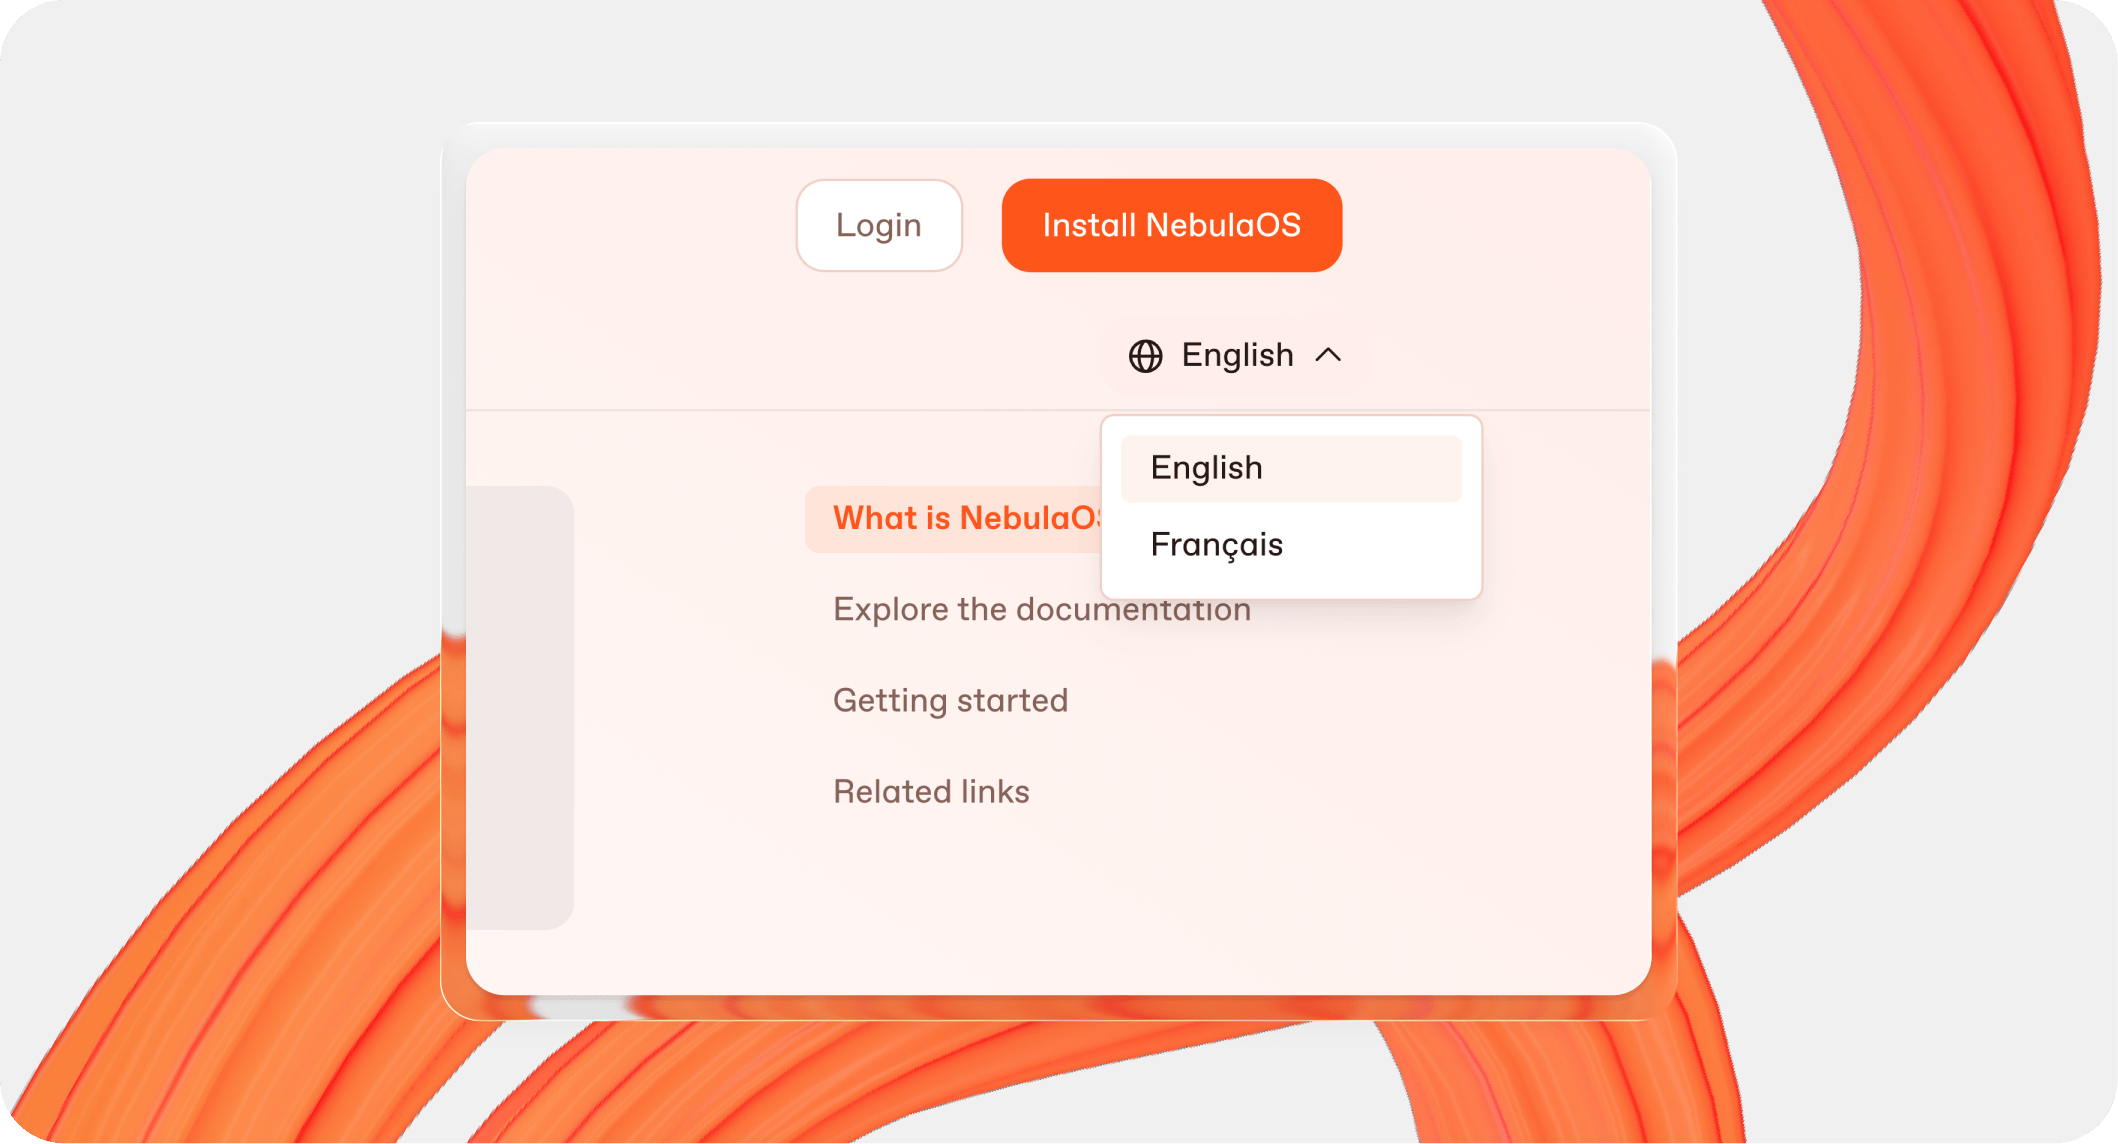
Users in your published docs can switch between versions or languages using a drop-down menu on the page.</p></figcaption></figure>

To add another space to your site and organize your site’s navigation bar, open the **Settings** tab at the top of your site dashboard and choose the **Structure** option. Here you can:

* See all your linked spaces
* Organize your content into [sections](https://app.gitbook.com/s/NkEGS7hzeqa35sMXQZ4X/publishing-documentation/site-structure/site-sections) and [variants](https://app.gitbook.com/s/NkEGS7hzeqa35sMXQZ4X/publishing-documentation/site-structure/variants)
* Create [site section groups](https://app.gitbook.com/s/NkEGS7hzeqa35sMXQZ4X/publishing-documentation/site-structure/site-sections#create-a-site-section-group)
* Choose your site’s home page
* Drag to change the navigation order
* Add more content to your site

You can **add new site sections** or site section groups to your site using the **+ Add** button at the top of the list. [Read our dedicated guide](https://gitbook-v2-q67etdj25-gitbook.vercel.app/url/gitbook.com/docs/guides/content-organization-and-localization/combine-multiple-docs-sites-using-sections) to find out more.

You can **add variants** by finding the site section you want to add a variant to, opening the **Actions menu** <picture><source srcset="https://1940848424-files.gitbook.io/~/files/v0/b/gitbook-x-prod.appspot.com/o/spaces%2FLBGJKQic7BQYBXmVSjy0%2Fuploads%2F7cf8zfPlr03Yuum7Ci1Y%2Factions%20-%20dark.svg?alt=media&#x26;token=cfb6727a-a8db-42b4-8a80-96936a34a062" media="(prefers-color-scheme: dark)"><img src="https://1940848424-files.gitbook.io/~/files/v0/b/gitbook-x-prod.appspot.com/o/spaces%2FLBGJKQic7BQYBXmVSjy0%2Fuploads%2FucOYUSvC3tAzcWxfqtvR%2Factions.svg?alt=media&#x26;token=a00b24ed-9830-4b66-86e9-c91e986acf29" alt=""></picture> and choosing **Add variant**. [Read our dedicated guide](https://gitbook-v2-q67etdj25-gitbook.vercel.app/url/gitbook.com/docs/guides/content-organization-and-localization/localize-your-docs-with-variants-in-gitbook) to find out more.

Your site’s navigation bar will show all the site sections and section groups in the order they appear in this list — so put your content in the order you want them to appear.

<figure><img src="https://1940848424-files.gitbook.io/~/files/v0/b/gitbook-x-prod.appspot.com/o/spaces%2FLBGJKQic7BQYBXmVSjy0%2Fuploads%2FiWQ5C8Leip88DQl6mD6L%2Fsettings-structure-menu%402x.png?alt=media&#x26;token=ec7c367a-a4be-442e-89d5-253746a2067d" alt=""><figcaption><p>
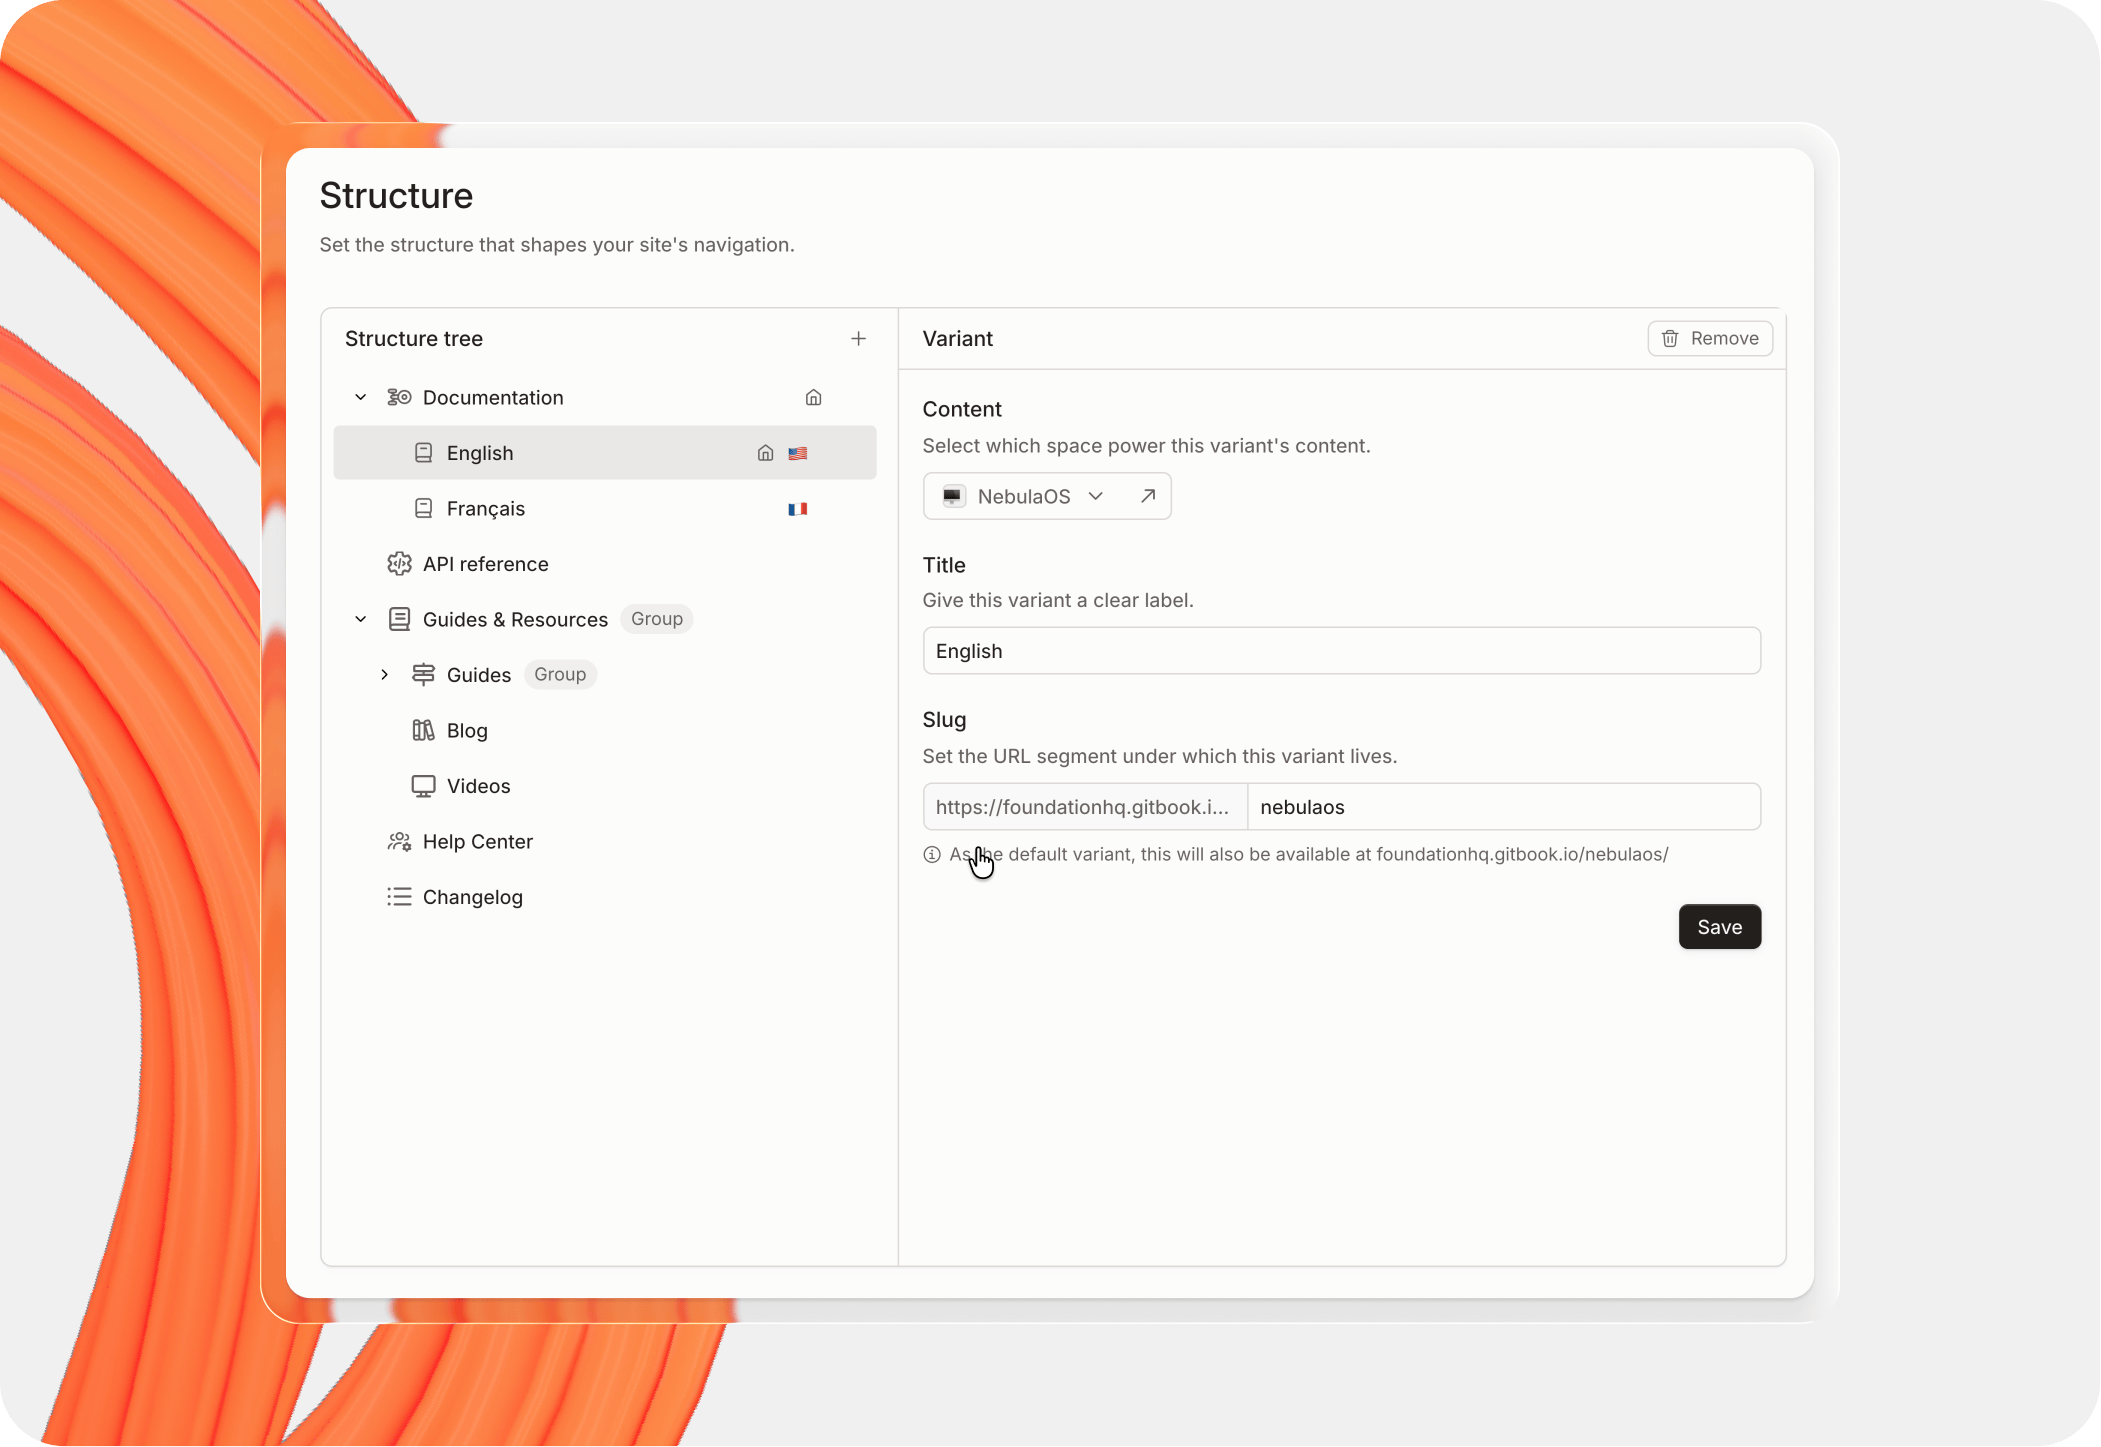
Add structure to your docs using site sections, section groups and variants.</p></figcaption></figure>

### Customize your site <a href="#customize-your-site" id="customize-your-site"></a>

While you could publish at this stage without making any further changes, let’s quickly run through some of your other options.&#x20;

{% hint style="info" %}
If you just want to publish your site without making any further changes, head down to [the Publishing section below](#audience-settings-and-publishing) to get your docs site live in seconds!
{% endhint %}

Still here? Great — let’s dive into the ways in which you can customize your docs site to add branding or just make it your own. There are a ton of options to try, so we won’t explain every single one here. [Read our docs](https://app.gitbook.com/s/NkEGS7hzeqa35sMXQZ4X/publishing-documentation/customization) to find out more about customization options.

To start customizing your docs site, open its dashboard and open the **Customize** tab. By default, you’ll begin editing the settings for your entire site — so if you’ve linked multiple spaces to a single site, these changes will apply to all of them.

<figure><img src="https://1940848424-files.gitbook.io/~/files/v0/b/gitbook-x-prod.appspot.com/o/spaces%2FLBGJKQic7BQYBXmVSjy0%2Fuploads%2F2mmmmmOHvO2oYsOr5puL%2Fcustomization-menu%402x.png?alt=media&#x26;token=ffa94841-56b4-4acf-8f19-4e0c0ee5a28d" alt=""><figcaption><p>
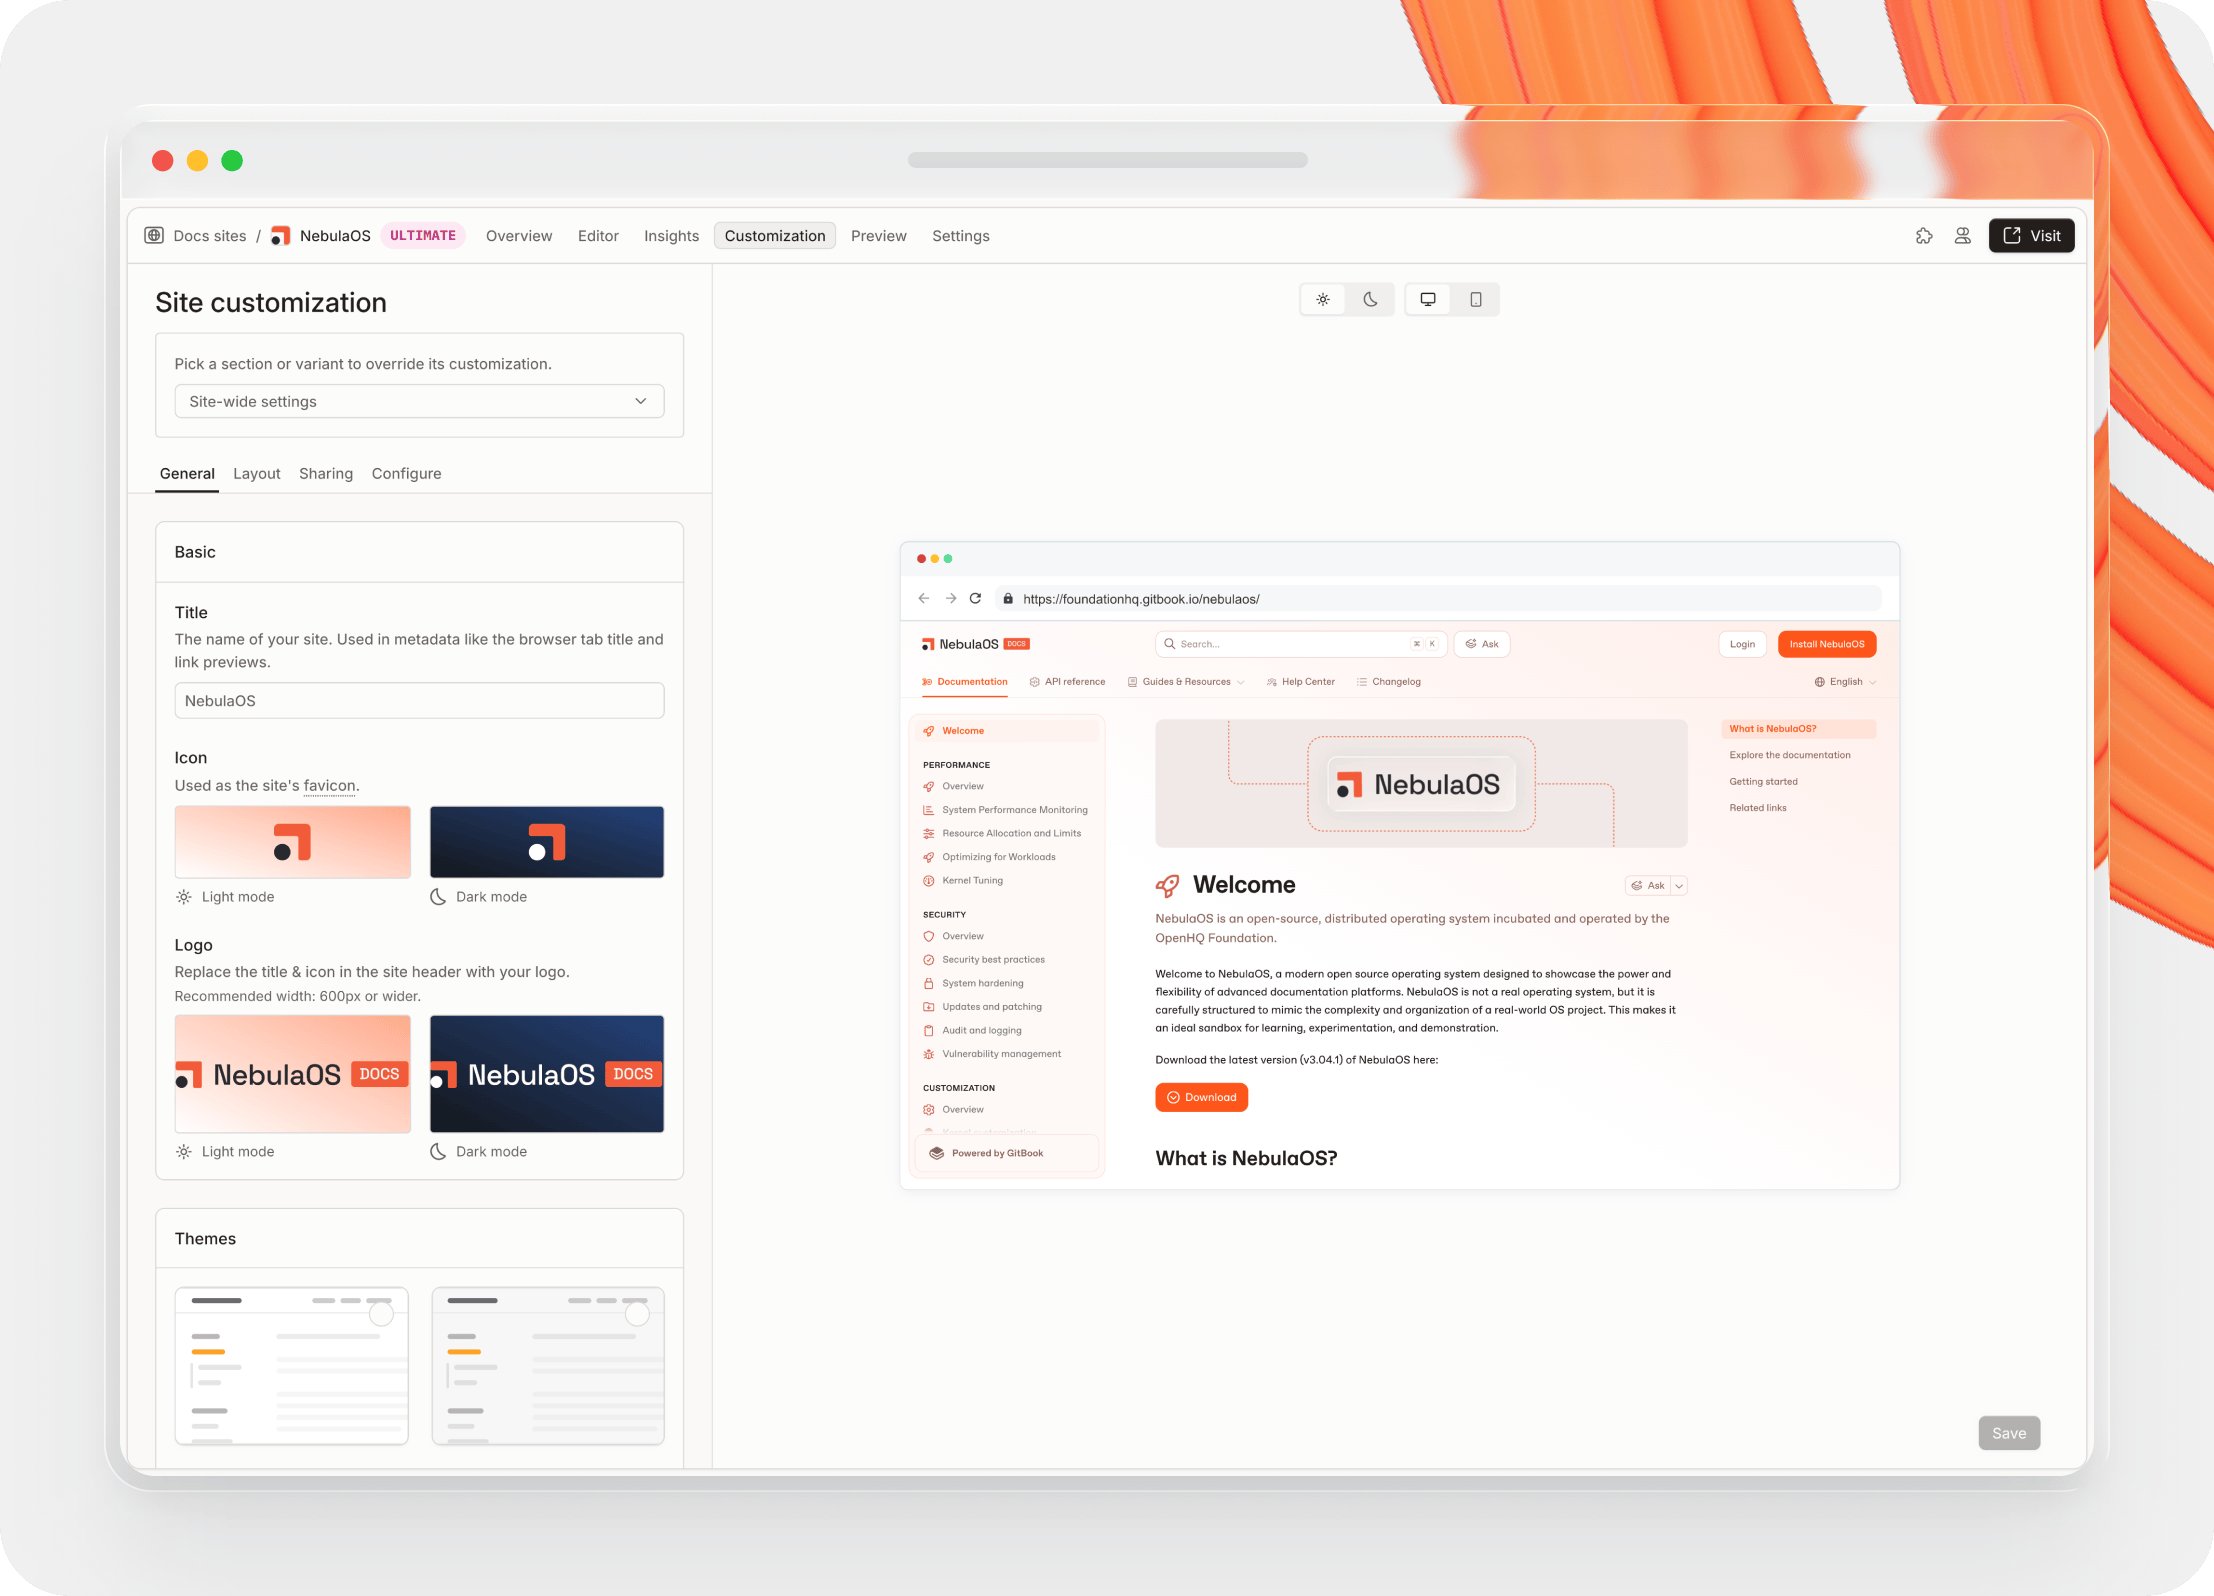
Customize your site from its customization settings.</p></figcaption></figure>

You can also select individual linked spaces if you want to control settings at a more granular level. For example, if you’ve linked spaces that refer to different products or releases, you may want to customize each one in a different way to match individual brands.

All the changes you make in the customization menu will appear in the preview on the right-hand side, so you can see how your choices look in context.

It’s worth noting that our advanced customization options are only available if you have a Premium or Ultimate site, so if you want the full suite of controls you may need to upgrade.

#### Change page options <a href="#change-page-options" id="change-page-options"></a>

You can also change some [customizations at a content level](https://app.gitbook.com/s/NkEGS7hzeqa35sMXQZ4X/creating-content/content-structure/page#page-options) — including adding header images and controlling the layout of your pages. To see these options, head back to your space and roll your cursor over the title at the top of the page.

In **Page Options** you can select one of our preset options, or manually toggle different controls on and off to create a custom layout.

<figure><img src="https://1940848424-files.gitbook.io/~/files/v0/b/gitbook-x-prod.appspot.com/o/spaces%2FLBGJKQic7BQYBXmVSjy0%2Fuploads%2FcRsUflO8fRl4VfwfI3LH%2Fpage-options-menu%402x.png?alt=media&#x26;token=3cb8e377-2a54-431f-9b13-5dc341fec160" alt=""><figcaption><p>
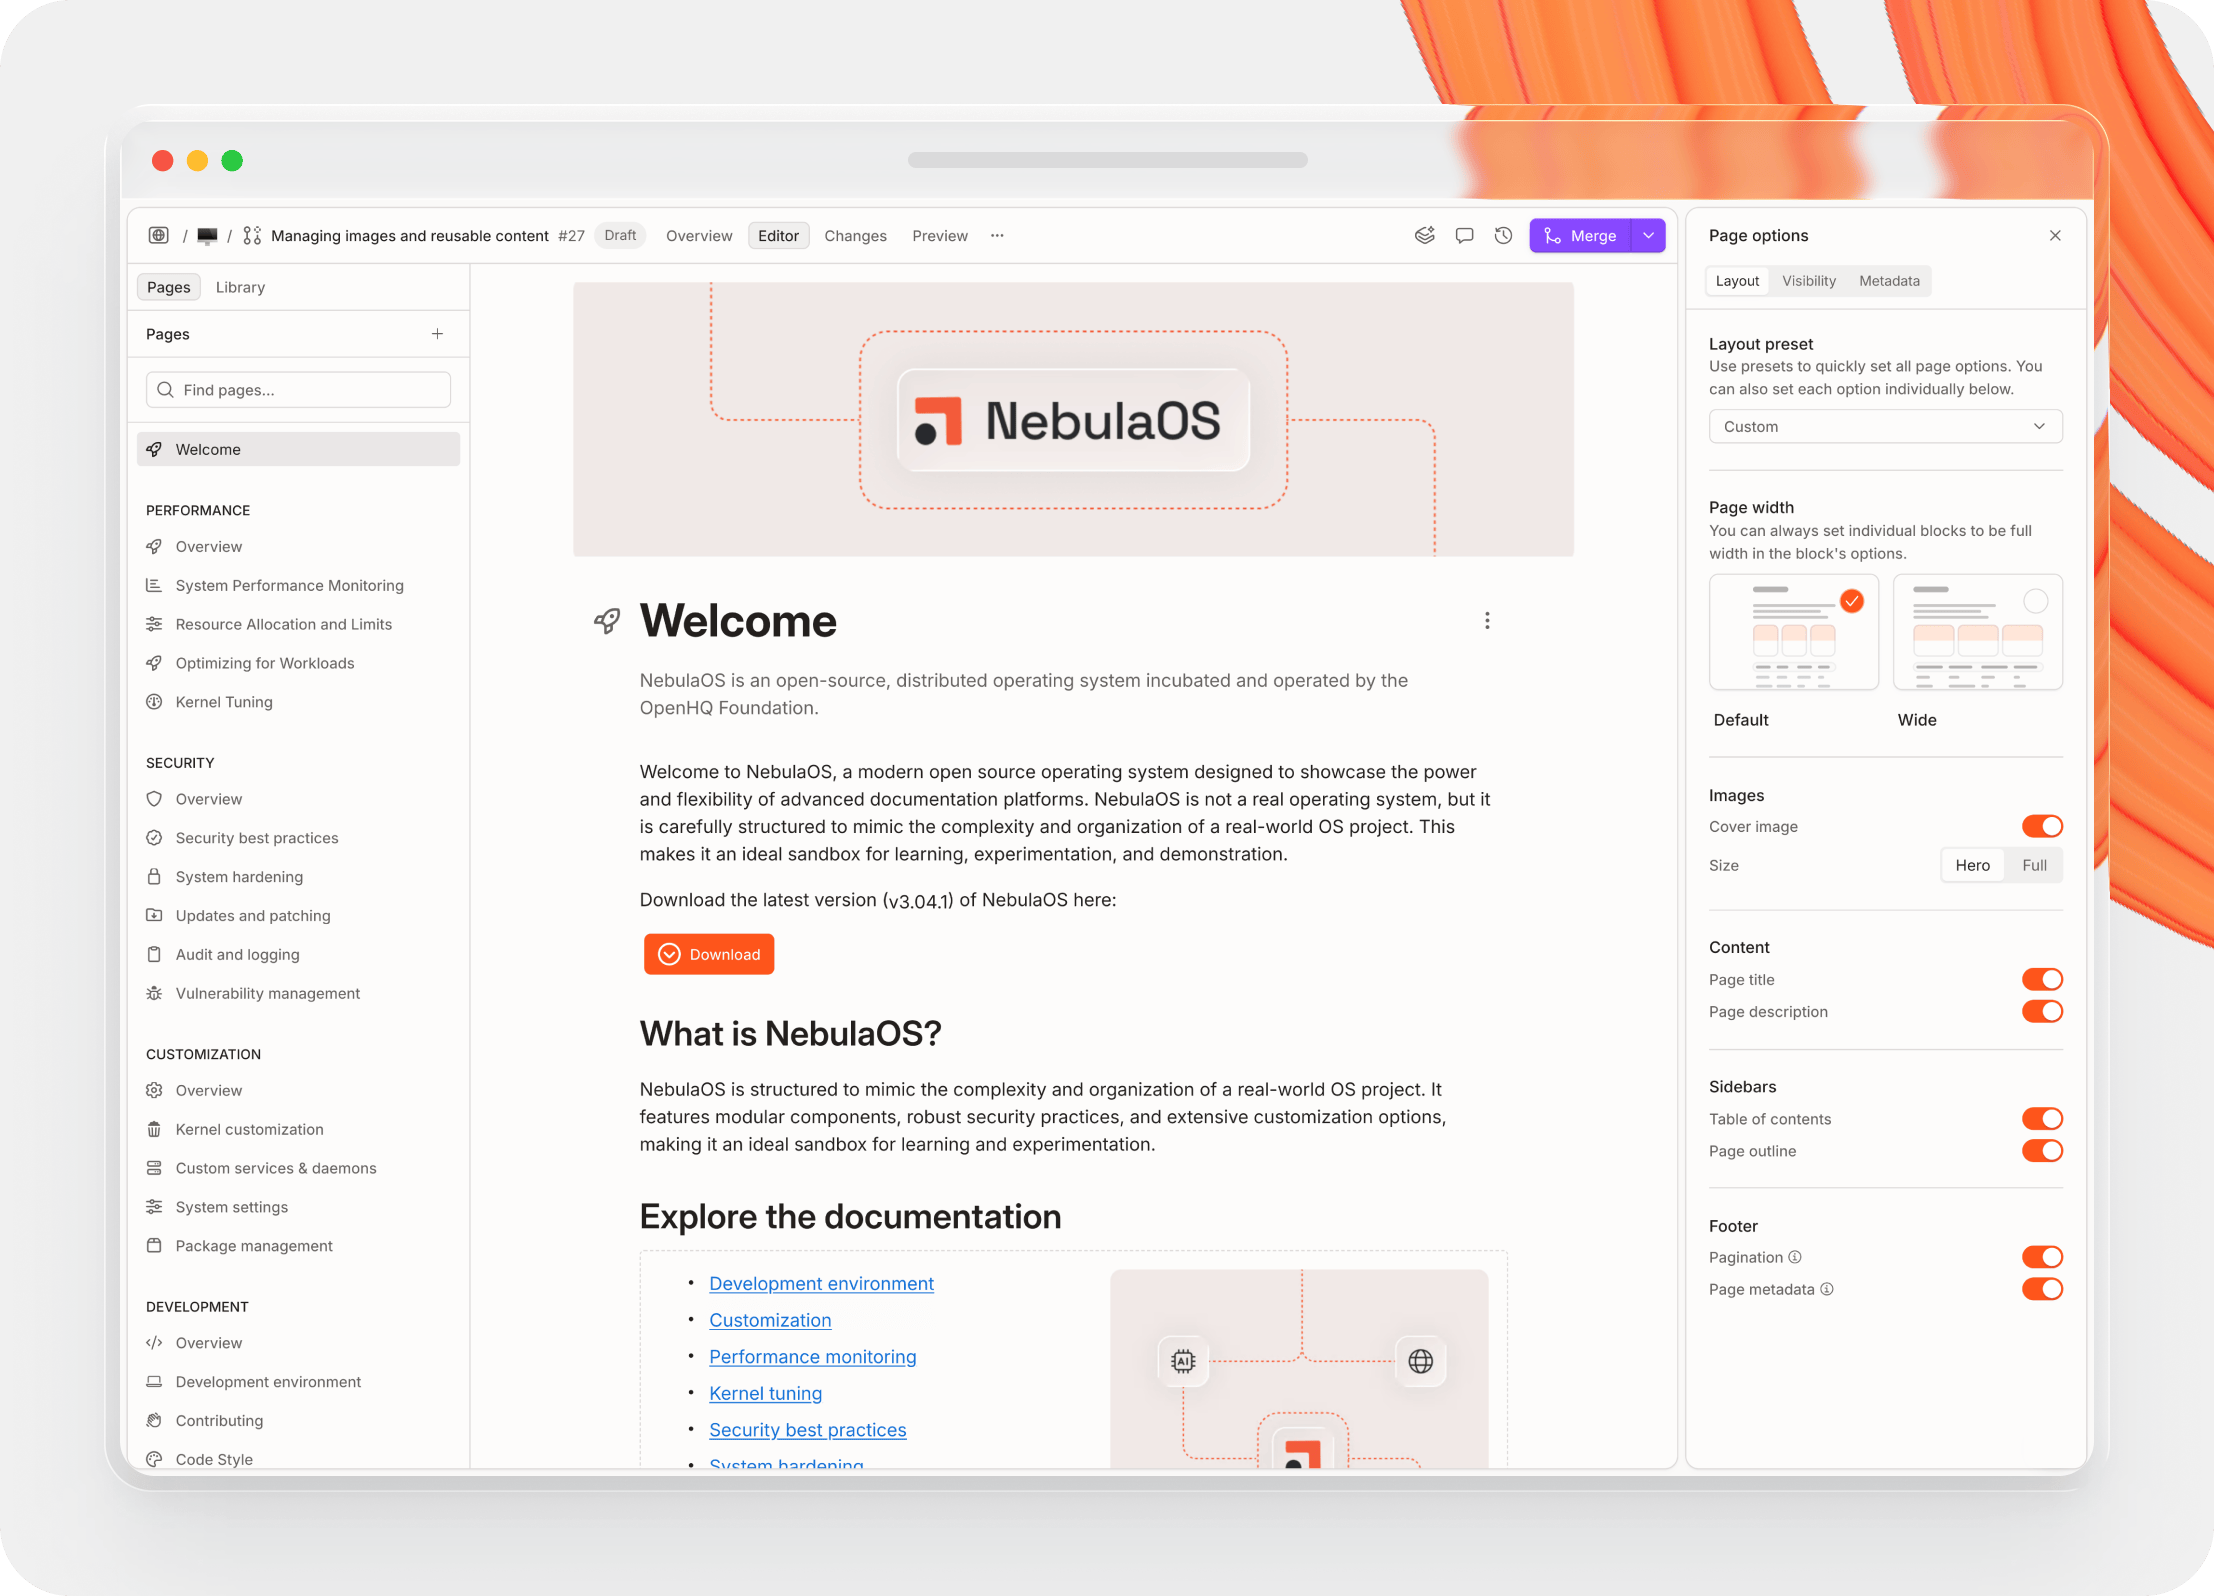
Update page specific settings in page options.</p></figcaption></figure>

### Change your site’s settings <a href="#change-your-site-s-settings" id="change-your-site-s-settings"></a>

Once you’ve got your site looking the way you want, you can also take a quick look over your site’s settings. Open the **Settings** tab at the top of your site dashboard.

Here you’ll see various sections on the left-hand side. In the **General** section, you can rename your site, add a social preview image, enable or disable the [insights](https://app.gitbook.com/s/NkEGS7hzeqa35sMXQZ4X/publishing-documentation/insights) cookie and unpublish or delete your site.

The **Audience** section holds your [audience settings](https://app.gitbook.com/s/NkEGS7hzeqa35sMXQZ4X/publishing-documentation/publish-a-docs-site#publish-your-content), and you can head to the **Domain and redirects** section to [set up a custom domain](https://app.gitbook.com/s/NkEGS7hzeqa35sMXQZ4X/publishing-documentation/custom-domain) or [a custom subdirectory](https://app.gitbook.com/s/NkEGS7hzeqa35sMXQZ4X/publishing-documentation/setting-a-custom-subdirectory) for your docs site — giving it a personal or branded touch. The **Redirects** section is where you can [create manual redirects](https://app.gitbook.com/s/NkEGS7hzeqa35sMXQZ4X/publishing-documentation/site-redirects), which is handy if you’ve just imported your docs from another platform.

In the **Structure** section you can organize all the content and structure the navigation on your site. Here, you can add [variants](https://app.gitbook.com/s/NkEGS7hzeqa35sMXQZ4X/publishing-documentation/site-structure/variants) to individual spaces, and also add [site sections](https://app.gitbook.com/s/NkEGS7hzeqa35sMXQZ4X/publishing-documentation/site-structure/site-sections) if you have an ultimate site. Head back up to [the section above](#adding-more-content-to-your-site) to find out more.

The **AI & MCP** section lets you [choose the AI experience](https://app.gitbook.com/s/NkEGS7hzeqa35sMXQZ4X/publishing-documentation/ai-search#choose-your-sites-search-experience) you want for your end-users — you can choose none, AI search or the full AI Assistant experience. In this section you can also customize the AI Assistant experience by adding suggested questions and connecting it to third-party tools via MCP servers — allowing it to answer with extra context from those tools.

<figure><img src="https://1940848424-files.gitbook.io/~/files/v0/b/gitbook-x-prod.appspot.com/o/spaces%2FLBGJKQic7BQYBXmVSjy0%2Fuploads%2F3G329Aguw1Sxcig1kjbK%2Fai-experience%20menu%402x.png?alt=media&#x26;token=136c0f42-af2b-477b-a389-7569b1fceb2a" alt=""><figcaption><p>
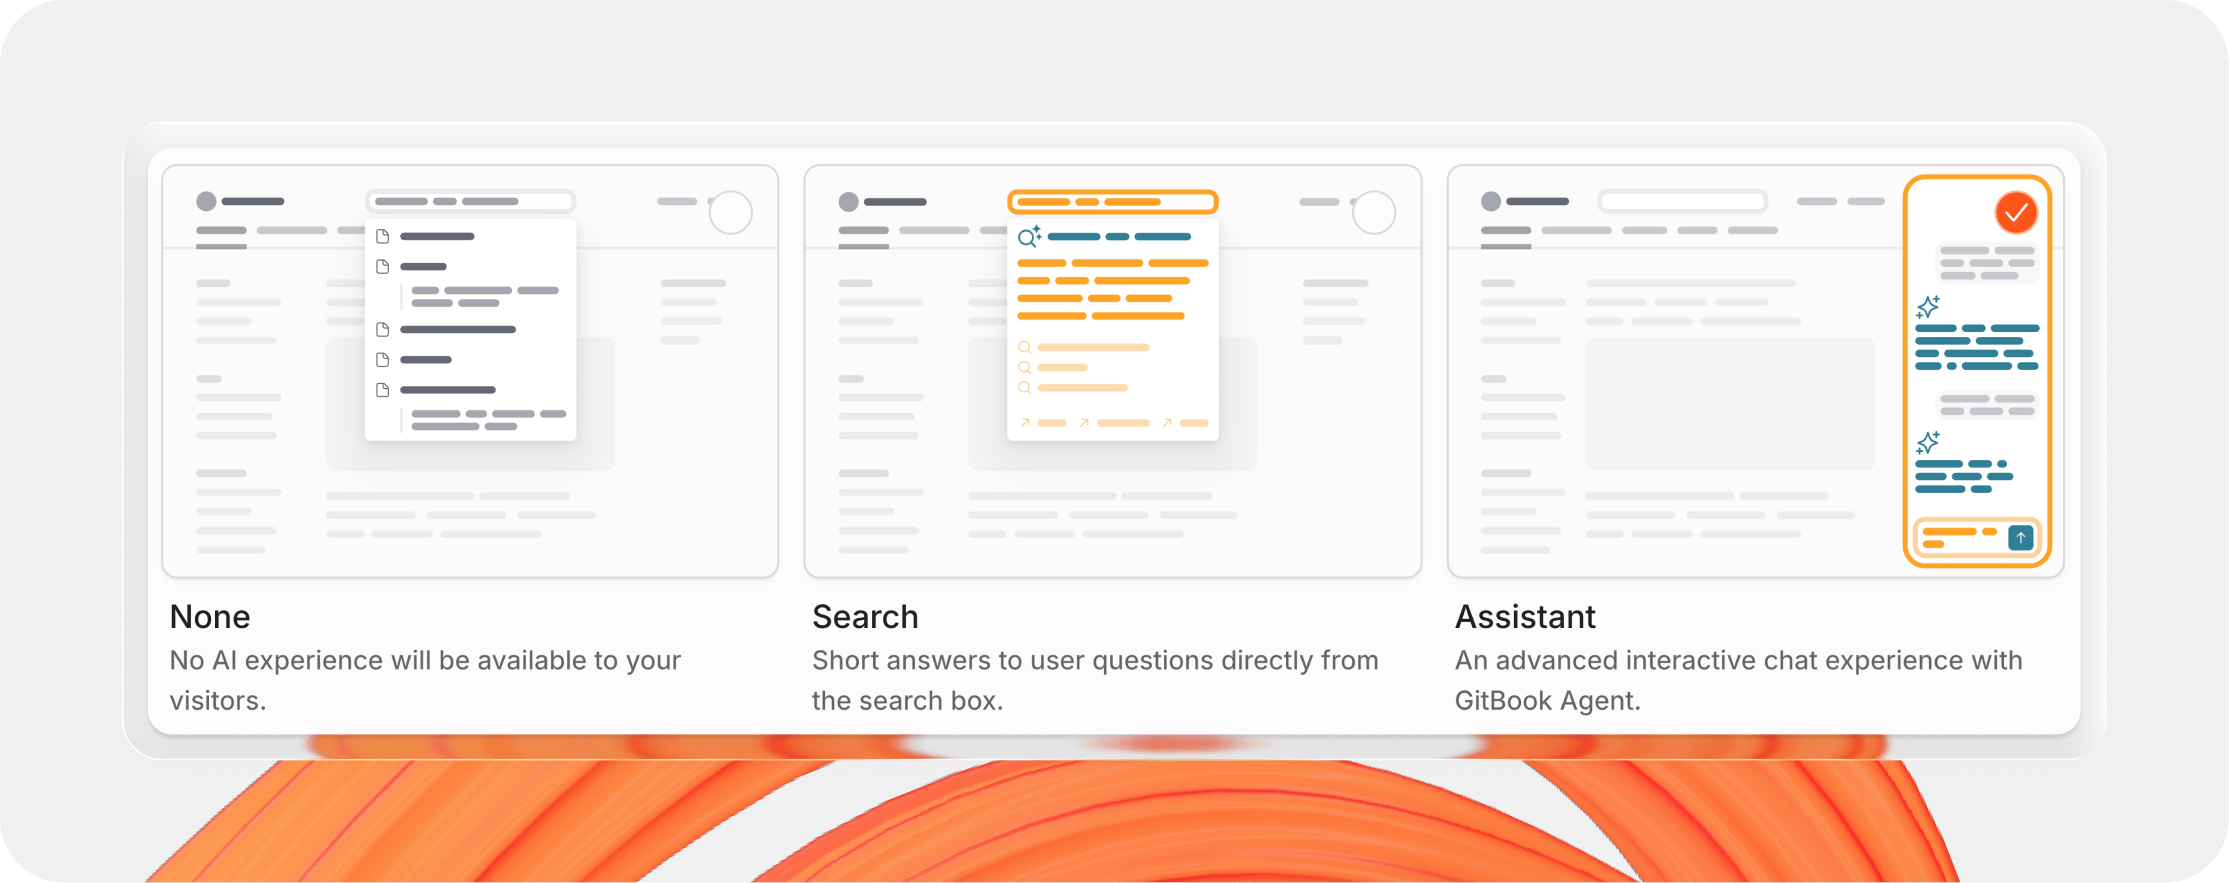
You can choose your published docs AI and search experience from the AI &#x26; MCP site settings page.</p></figcaption></figure>

Next up is the **Docs Embed** section, which allows you to [embed your documentation](https://app.gitbook.com/s/NkEGS7hzeqa35sMXQZ4X/publishing-documentation/embedding) and AI Assistant into your product, website, or anywhere else you like. This lets your users browse your docs in a small pop-up window, or chat to GitBook Assistant — which will answer based on your docs and other sources connected via MCP.

Finally, the **Plan** tab lets you upgrade or downgrade your site to a different plan. So if you want to try out site sections, GitBook Assistant or any other features that aren’t included in your plan, this is the place to go.

### Change audience settings and publish <a href="#audience-settings-and-publishing" id="audience-settings-and-publishing"></a>

Once you’ve created your site and added some content, you can go right ahead and publish.

By default, your site will be set to publish publicly — you can change this in the **Audience** section of your site’s **Settings** page.

<figure><img src="https://1940848424-files.gitbook.io/~/files/v0/b/gitbook-x-prod.appspot.com/o/spaces%2FLBGJKQic7BQYBXmVSjy0%2Fuploads%2FpBXAhIP1Agf9lvIZzfYq%2Fsettings-audience-menu%402x.png?alt=media&#x26;token=773c9263-807d-495c-91c1-0f2536790e17" alt=""><figcaption><p>
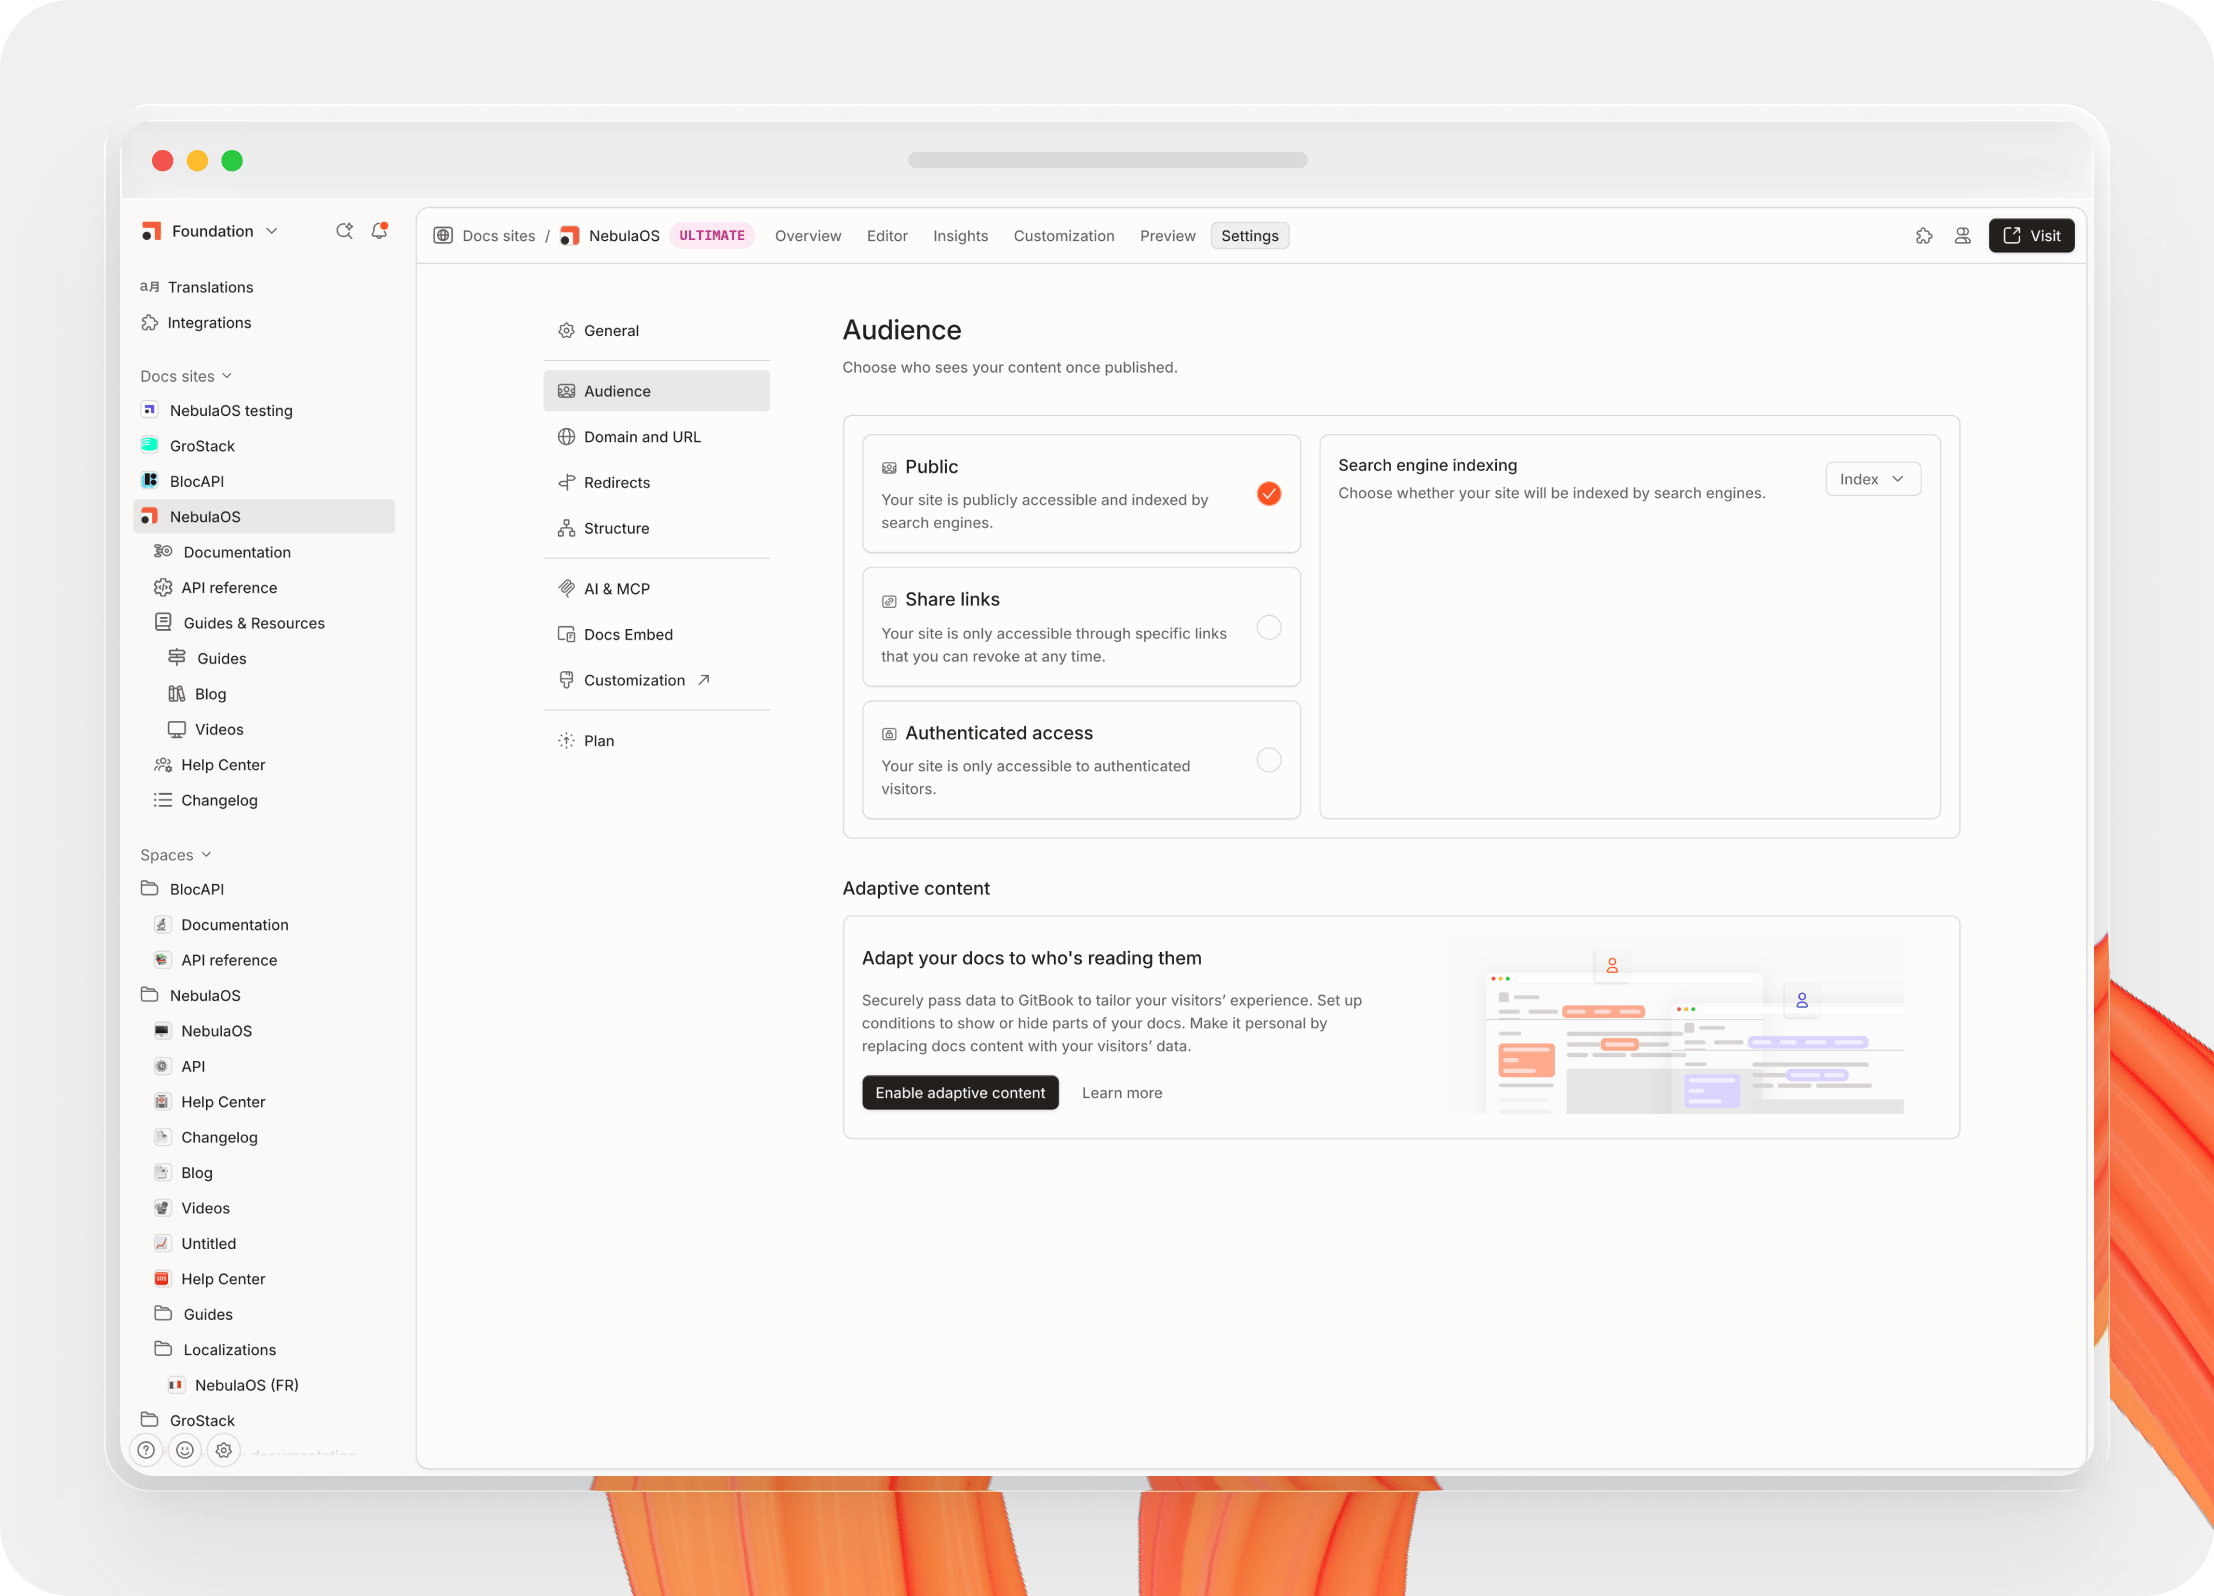
Update who can view your site in the audience settings section.</p></figcaption></figure>

Once you’ve set your chosen audience — or if you’re happy to publish publicly — all you have to do is hit **Publish** and your site will be live! Of course, you can continue editing your site’s customization and settings when it’s live, as well as editing the content and linking more spaces if you wish.

{% hint style="info" %}
**Note:** Some publishing options are only available on [Premium or Ultimate sites](https://www.gitbook.com/pricing), so if you want some of the more advanced options you may need to upgrade.
{% endhint %}

#### Public <a href="#public" id="public"></a>

As you might imagine, this publishes your site publicly, so it will be visible to everyone on the web.

By default, your public site will also be indexed by search engines. If you don’t want your site to be indexed or appear in search results — such as if you’re publishing beta documentation or a version update — you can disable that in the menu.

{% hint style="info" %}
**Note:** This setting applies to the entire site. You can also [hide or disable indexing for individual pages](https://app.gitbook.com/s/NkEGS7hzeqa35sMXQZ4X/creating-content/content-structure/page#visibility) if you want more granular control.
{% endhint %}

#### Share links <a href="#share-links" id="share-links"></a>

With [share links](https://app.gitbook.com/s/NkEGS7hzeqa35sMXQZ4X/publishing-documentation/publish-a-docs-site/share-links), you can create unique, private links to your docs to send to specific user groups. You can revoke a link at any time, so if a specific group no longer needs access to your docs it’s easy to remove them. Only people with an active link will be able to access your docs site, which won’t be indexed by search engines.

#### Authenticated access <a href="#authenticated-access" id="authenticated-access"></a>

Take things one step further with [authenticated access](https://app.gitbook.com/s/NkEGS7hzeqa35sMXQZ4X/publishing-documentation/authenticated-access). You’ll need to set up the authorization backend using either one of our [auth integrations](https://app.gitbook.com/s/NkEGS7hzeqa35sMXQZ4X/publishing-documentation/authenticated-access/enabling-authenticated-access), or with your own custom setup.

Once set up, visitors to your docs will be prompted to log in using their established credentials. Only people authorized in your backend will be able to access your docs. This is ideal if you want to control exactly who can view your documentation.

### Check the built-in site analytics <a href="#check-the-built-in-site-analytics" id="check-the-built-in-site-analytics"></a>

Now that your docs site is live, let’s take a quick look at your site analytics. GitBook offers some simple [insights](https://app.gitbook.com/s/NkEGS7hzeqa35sMXQZ4X/publishing-documentation/insights) out of the box, and if you want more detail about your site and its performance, we have several integrations that can help — including [Google Analytics](https://www.gitbook.com/integrations/googleanalytics), [Fathom](https://www.gitbook.com/integrations/fathom) and more.

For now, let’s stick with our built-in tools.

In the **Insights** tab of your site’s dashboard, you can jump between different sections to view data for things like Traffic, Pages & feedback, and Ask AI. They’ll show you useful information about how your end-users are behaving on your site, and what they’re looking at.

You can use **filters** to focus on data about specific pages, sections and more, or look for data based on the user’s country, language, device and more.

You can also use **groups** to organize that data in different ways, and select different date ranges to meet your needs.

If you want to analyze a specific data set further, you can export any of your chosen data as a CSV file and open it in your own tools.&#x20;

Find out more about what you can do with insights [in our documentation](https://app.gitbook.com/s/NkEGS7hzeqa35sMXQZ4X/publishing-documentation/insights#feedback).

<figure><img src="https://1940848424-files.gitbook.io/~/files/v0/b/gitbook-x-prod.appspot.com/o/spaces%2FLBGJKQic7BQYBXmVSjy0%2Fuploads%2FWUlqFKWQDAdfEqfTIOiX%2Fsite-insights-menu%402x.png?alt=media&#x26;token=de7a93c2-2824-4092-b6b6-79948c5919c8" alt=""><figcaption><p>
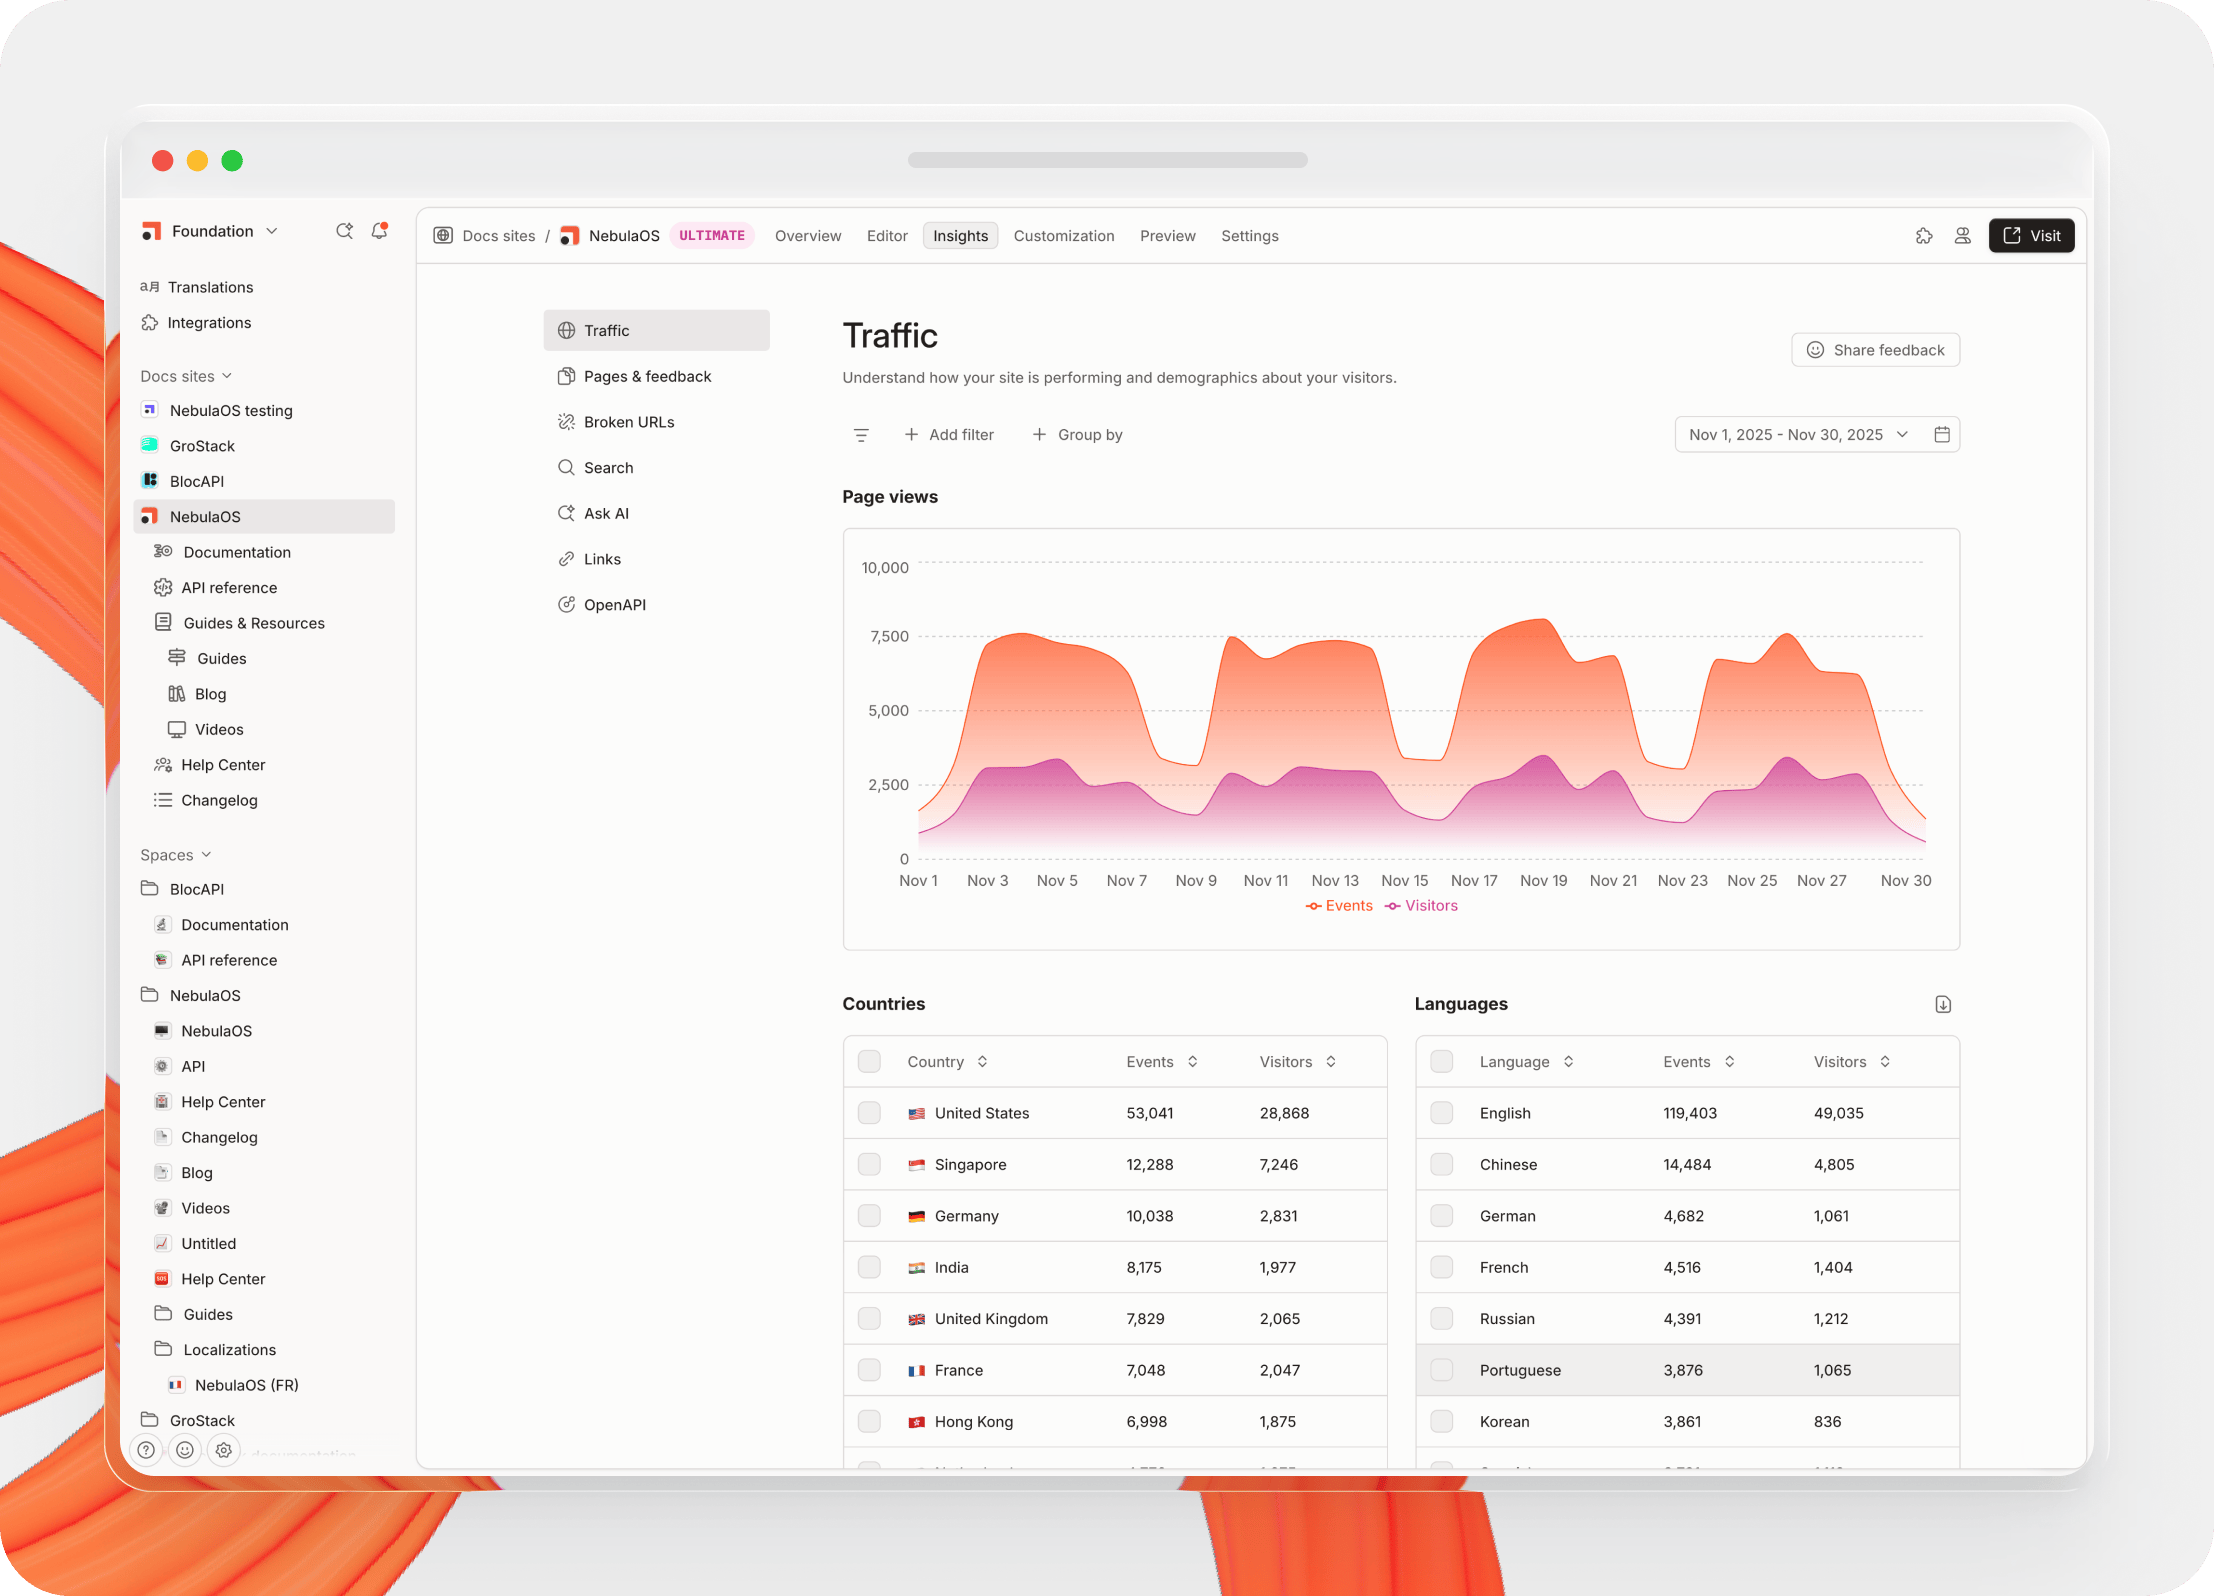
Get insights into how your site is performing, and how visitors are behaving.</p></figcaption></figure>

### There’s more to explore

That's a quick overview of how to set up, customize and publish your first docs site in GitBook. With so many options available, you’ll be able to make every page you publish feel like your own.

But there’s a lot more you can do with GitBook that we haven’t mentioned here — including:

* **Proactive docs Agent** — [GitBook Agent](https://app.gitbook.com/s/NkEGS7hzeqa35sMXQZ4X/gitbook-agent) can connect to third-party tools like Intercom and proactively suggest and implement docs changes, ready for your review.
* **Write and review with AI** — The Agent can also write content for you based on a prompt, review your docs, match your style guide and optimize your content to improve readability.
* **Continuous translations** — Use built-in tools to [translate your docs with AI](https://app.gitbook.com/s/NkEGS7hzeqa35sMXQZ4X/gitbook-agent/translations), and keep those translations updated whenever you edit your primary docs.
* **Adaptive docs** — Create [a tailored docs experience for every user ](https://app.gitbook.com/s/NkEGS7hzeqa35sMXQZ4X/publishing-documentation/adaptive-content)based on individual user attributes, such as their plan, access level, location and more.

We love seeing your GitBook docs, so feel free to [share them with us on X](https://x.com/gitbookio). And if you have any questions or ideas, you can [join our GitBook community](https://github.com/GitbookIO/community), or reach out to our support team — they’d be happy to help!

***

[**→ Get started with GitBook for free**](https://app.gitbook.com/join)

[**→ Read our documentation about publishing**](https://app.gitbook.com/s/NkEGS7hzeqa35sMXQZ4X/publishing-documentation)

[**→ Find out how GitBook automatically optimizes your docs**](https://app.gitbook.com/s/NkEGS7hzeqa35sMXQZ4X/getting-started/ai-documentation)
